Build a Snippet App with Dart Frog and Globe KV
A step-by-step guide to building a full-stack Dart application using Dart Frog and best practices like MVC.
This guide walks you through building a simple web application that can save and share text snippets. You will learn how to structure a Dart Frog application using a Model-View-Controller (MVC) pattern, persist data with Globe KV, and render a modern user interface.
20 min read
Features Covered
- Structuring a Dart Frog app with Model, View, and Controller separation.
- Handling
GETandPOSTrequests using file-based routing. - Using Dart Frog's dependency injection to provide services to your routes.
- Storing and retrieving data with Globe KV.
Prerequisites
- Dart SDK Installed: If you have Flutter installed, the Dart SDK is already included. If not, Install Dart.
- Globe Account: You'll need an account to deploy projects. Sign up or log in to Globe.
- Globe CLI Installed and Authenticated: Install the CLI by running
dart pub global activate globe_cliand log in usingglobe login. - Dart Frog CLI Installed: Install the Dart Frog CLI by running
dart pub global activate dart_frog_cli.
Step 1: Create a Dart Frog Project
First, create a new Dart Frog project from your terminal.
# Create a new Dart Frog project
dart_frog create snippet_app

# Navigate into your new project directory
cd snippet_app
Step 2: Set Up the Model (KV Namespace & Dependencies)
Our Model will be Globe KV, which handles our data persistence.
1 Create a KV Namespace: In your Globe dashboard, navigate to the KV section and create a new namespace called snippets. Copy the provided Namespace ID.
2 Add Dependencies: Add the globe_kv package and the uuid package for generating unique identifiers.
dart pub add globe_kv
dart pub add uuid
Step 3: Create the View
The View is responsible for our app's presentation. Create a dedicated file for all HTML rendering and styling.
Create a new file at lib/views.dart:
class Views {
static const _css = '''
body { margin: 2em; background-color: #121212; color: #e0e0e0; font-family: -apple-system, BlinkMacSystemFont, sans-serif; }
h1 { color: #bb86fc; font-weight: 300; }
textarea, pre { width: 100%; max-width: 800px; box-sizing: border-box; background-color: #1e1e1e; border: 1px solid #333; color: #e0e0e0; border-radius: 4px; padding: 1em; font-size: 1em; }
textarea { height: 250px; }
button { background-color: #bb86fc; color: #121212; border: none; padding: 12px 18px; border-radius: 4px; cursor: pointer; font-weight: bold; font-size: 1em; }
a { color: #03dac6; text-decoration: none; }
pre { white-space: pre-wrap; word-wrap: break-word; }
''';
static String renderHomePage() {
return '''
<!DOCTYPE html>
<html><head><title>New Snippet</title><style>$_css</style></head>
<body>
<h1>Create a New Snippet</h1>
<form action="/" method="POST">
<textarea name="content" placeholder="Paste your text here..." required></textarea><br/><br/>
<button type="submit">Save Snippet</button>
</form>
</body></html>
''';
}
static String renderSnippetPage(String id, String content) {
final sanitizedContent =
content.replaceAll('<', '<').replaceAll('>', '>');
return '''
<!DOCTYPE html>
<html><head><title>View Snippet</title><style>$_css</style></head>
<body>
<a href="/">← Create another snippet</a>
<h1>Your Snippet</h1>
<pre>$sanitizedContent</pre>
</body></html>
''';
}
static String renderNotFoundPage() {
return '''
<!DOCTYPE html>
<html><head><title>Not Found</title><style>$_css</style></head>
<body>
<h1>404 - Snippet Not Found</h1>
<p><a href="/">Create a new snippet</a></p>
</body></html>
''';
}
}
Step 4: Create the Controller
The Controller contains our application logic. It will handle requests, interact with Globe KV, and use the View to render a response.
Create a new file at lib/snippet_controller.dart:
import 'dart:io';

import 'package:dart_frog/dart_frog.dart';
import 'package:globe_kv/globe_kv.dart';
import 'package:snippet_app/views.dart';
import 'package:uuid/uuid.dart';

class SnippetController {
  SnippetController(this._kv);

  final GlobeKV _kv;

  Response getHomePage(RequestContext context) {
    return Response(
      statusCode: HttpStatus.seeOther,
      body: Views.renderHomePage(),
      headers: {'Content-Type': 'text/html'},
    );
  }

  Future<Response> saveSnippet(RequestContext context) async {
    final formData = await context.request.formData();
    final content = formData.fields['content'] ?? 'No content';
    final id = const Uuid().v4();

    await _kv.set('snippet:$id', content);

    return Response(
      statusCode: HttpStatus.seeOther,
      headers: {
        HttpHeaders.locationHeader: '/view/$id',
      },
    );
  }

  Future<Response> getSnippet(RequestContext context, String id) async {
    final content = await _kv.getString('snippet:$id');

    if (content == null) {
      return Response(
        statusCode: 404,
        body: Views.renderNotFoundPage(),
        headers: {'Content-Type': 'text/html'},
      );
    }
    return Response(
      body: Views.renderSnippetPage(id, content),
      headers: {'Content-Type': 'text/html'},
    );
  }
}
Step 5: Wire Dependencies and Routes
With Dart Frog, we use middleware for dependency injection and create files in the routes directory for our endpoints.
-
Provide the Controller via Middleware: Create a file at
routes/_middleware.dartto make your controller available to all routes.import 'package:dart_frog/dart_frog.dart'; import 'package:globe_kv/globe_kv.dart'; import 'package:snippet_app/snippet_controller.dart'; Handler middleware(Handler handler) { return handler .use( provider<SnippetController>( (context) => SnippetController(context.read<GlobeKV>()), ), ) .use( provider<GlobeKV>((_) => GlobeKV('your-namespace-id')), ); } -
Create the Home Route (
/): Modify the existingroutes/index.dartfile. It will handle bothGETrequests (to show the form) andPOSTrequests (to save a snippet).import 'package:dart_frog/dart_frog.dart'; import 'package:snippet_app/snippet_controller.dart'; Future<Response> onRequest(RequestContext context) async { final controller = context.read<SnippetController>(); if (context.request.method == HttpMethod.post) { return controller.saveSnippet(context); } return controller.getHomePage(context); } -
Create the View Snippet Route (
/view/[id]):import 'package:dart_frog/dart_frog.dart'; import 'package:snippet_app/snippet_controller.dart'; Future<Response> onRequest(RequestContext context, String id) async { final controller = context.read<SnippetController>(); return controller.getSnippet(context, id); }
Step 6: Deploy and Test
With the Dart Frog structure in place, you are ready to deploy.
# Run locally to test (optional)
dart_frog dev

# Deploy to Globe
globe deploy --prod
Visit your application's URL to see the form. When you save a snippet, you will be redirected to a /view/<id> page with a unique UUID in the URL.
Your Deployed Application
Congratulations! You've successfully built and deployed a full-stack Dart application. The final result should look like this:
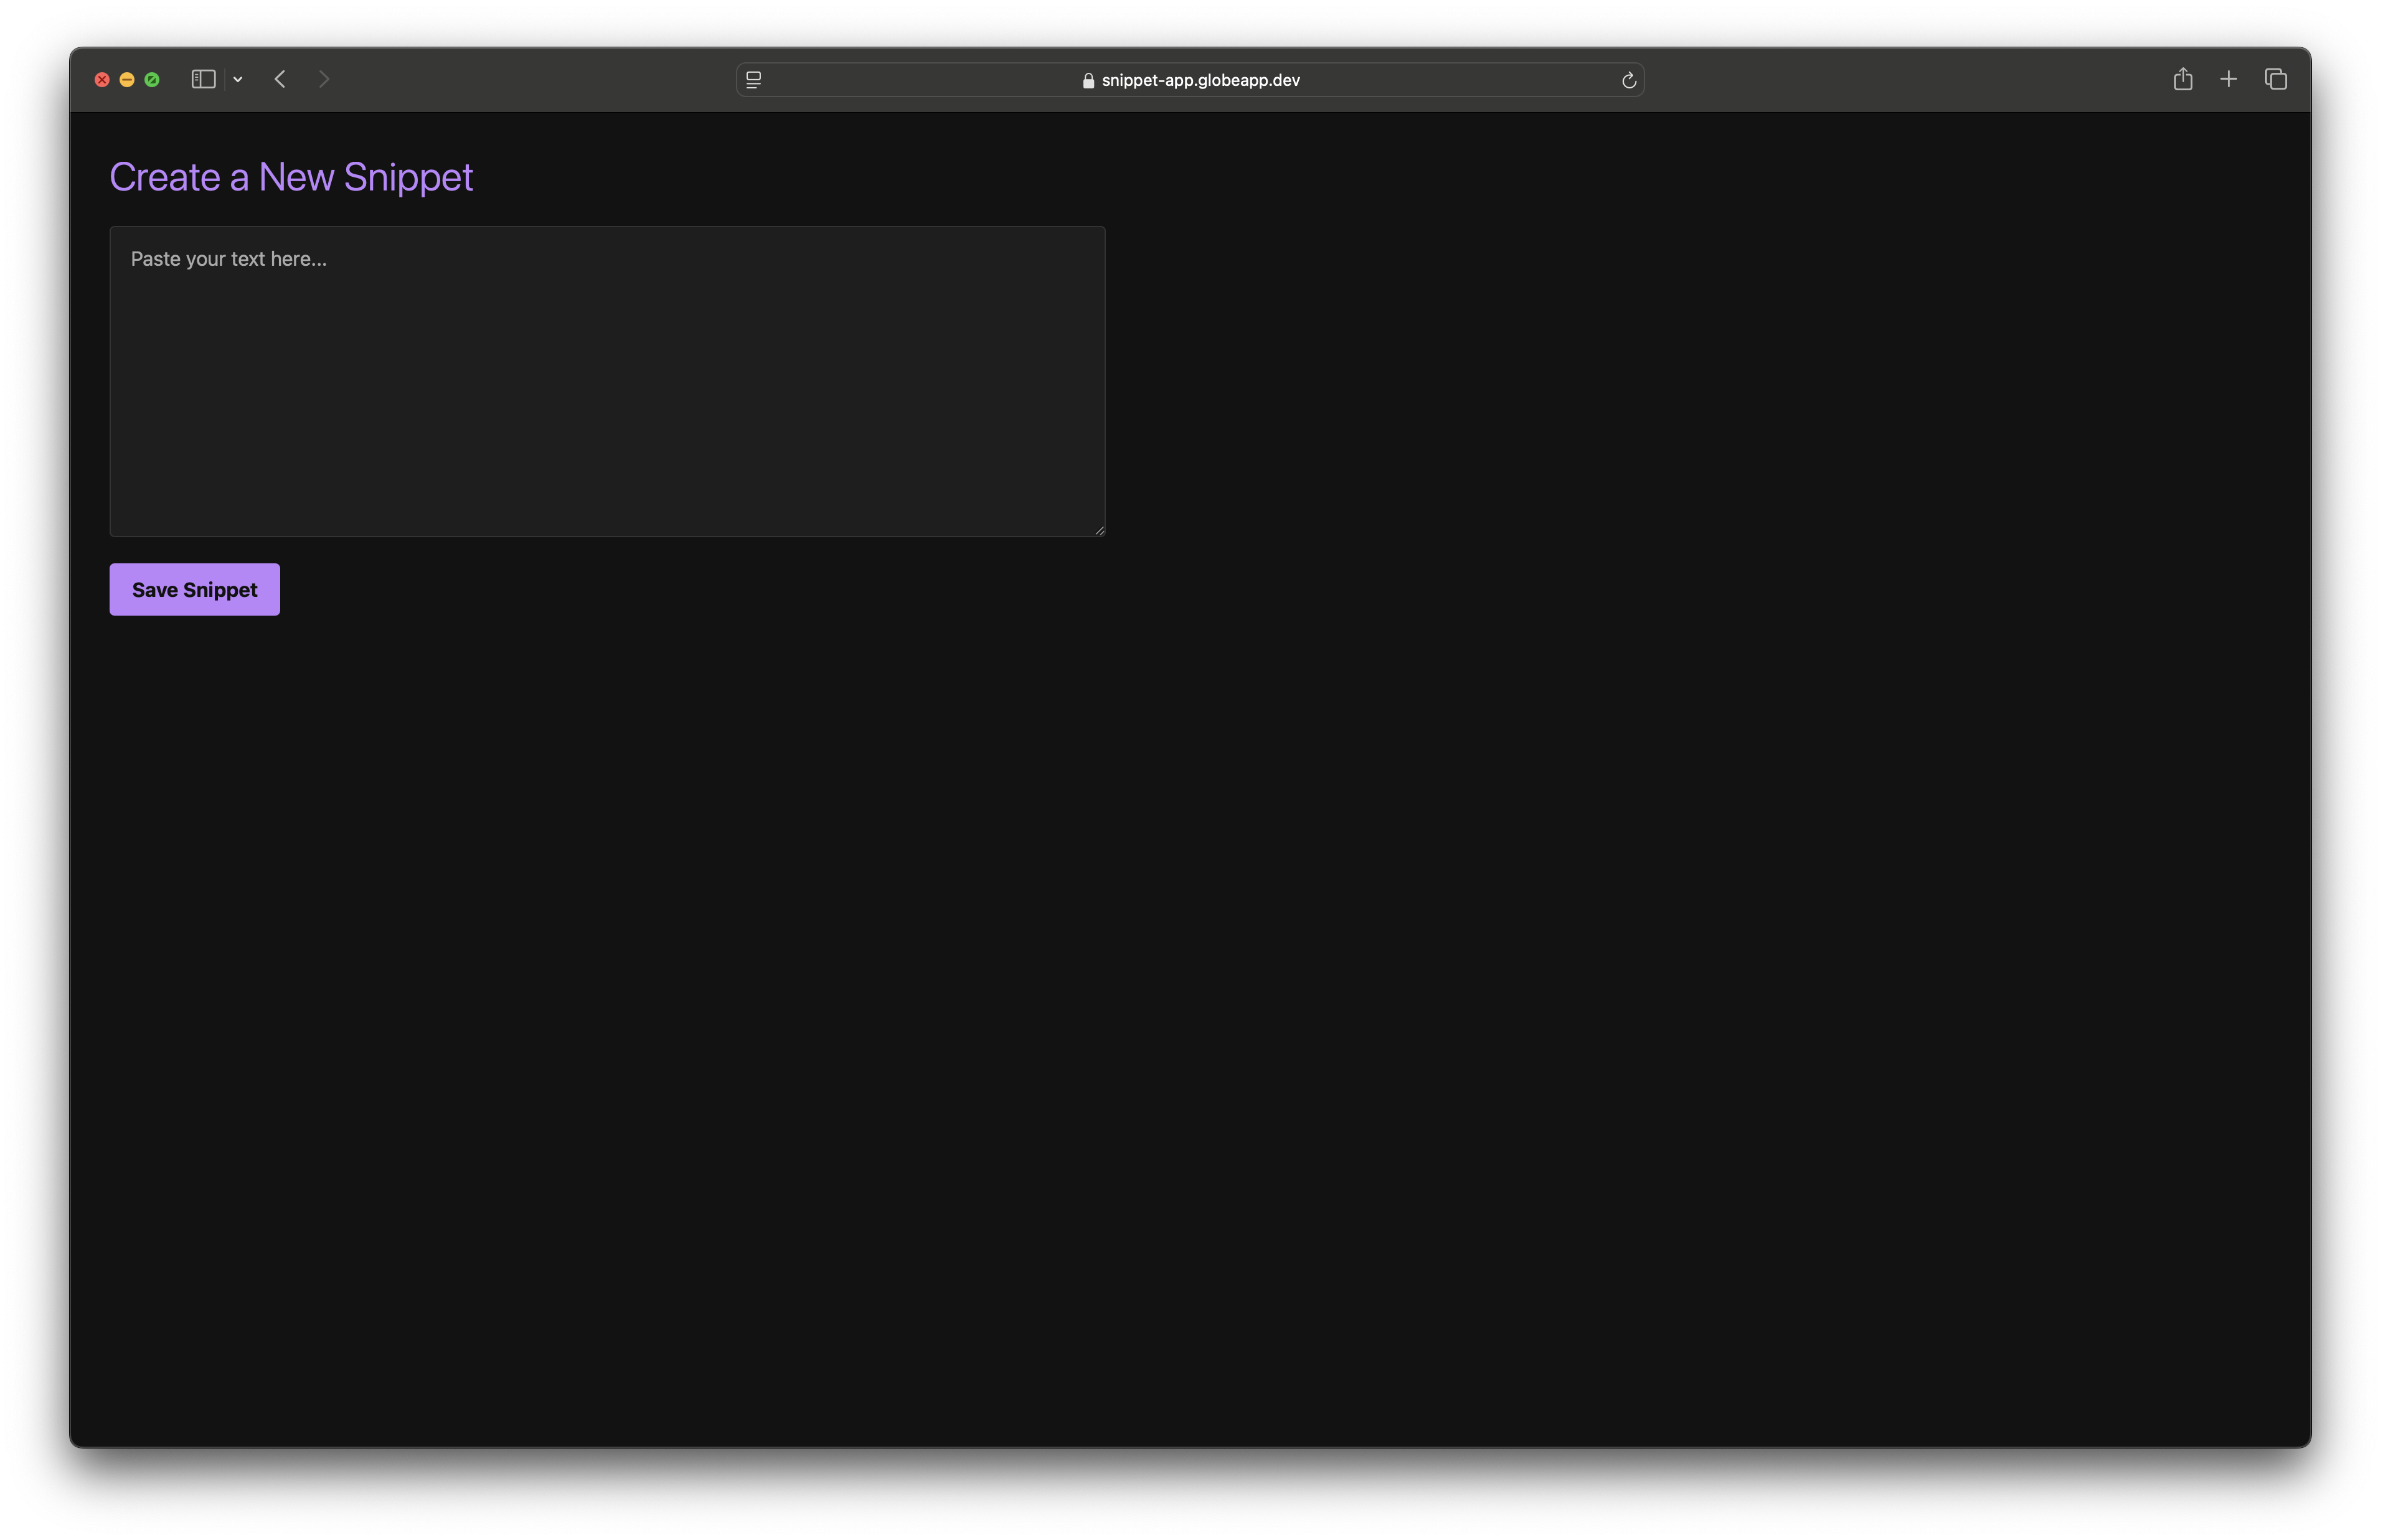
You can see and interact with a live version of the final product here
What's Next
- Implement Authentication: Add a user system so people can manage their own private snippets. Our guide on How to Secure Your Dart APIs on Globe provides a great foundation.
- Add Expiration: Use Globe KV's
ttlfeature to make your snippets automatically expire. - Explore Dart Frog: Dive deeper into Dart Frog's features like middleware and error handling by reading the official documentation.
Couldn't find the guide you need? Talk to us in Discord